
Support – SideSwipe
Please read the following details for support with your BIO-key SideSwipe fingerprint reader. It is important to review all details on this page.
Important Details & Usage
Important: Please ensure your Windows computer is up to date with Windows Updates, as new device drivers may be blocked if you are not current or awaiting a reboot to complete an install. See Windows Settings and Updates for status.
- Plugin the fingerprint reader to a USB port
- Drivers should automatically download from Windows Update and install
- Monitor the System Tray in the lower right for messages of installing and complete
- You can confirm the drivers are installed by checking the Windows Device Manager for the biometric device
- If drivers fail to download, you can get them from the Reader Documentation pages below.
- Install the drivers, use Windows Device Manager to update drivers, and point to the downloaded driver files
Usage in Windows Hello:
- Go to user Accounts off the start menu (Windows 10)
- Select Sign In Options
- Assure a PIN is set, as that will allow a biometric to be used
- Select to Enroll a Fingerprint, and follow prompts to enroll
- You may enroll more than one finger, but enroll only one finger per enrollment pass
- Proceed to use your Fingerprint or PIN to log in to your Windows system
Note: Some domain-joined computers may limit the ability to use PINs or Biometrics as a domain security policy. Speak with your system administrator on opening those permissions to allow the use of the fingerprint reader.
Select your operating system for full details
Windows 10
SideSwipe for Windows 10
The BIO-key SideSwipe utilizes Windows Biometric Framework (WBF) drivers that are automatically downloaded from Windows Updates after the reader is connected.
Users enroll and manage biometric credentials via Windows Hello, within the PC Settings.
No additional 3rd party software is required to sign-in to Windows using a fingerprint.
Installation and troubleshooting steps are described below.
Before Installing
- Ensure that you have a valid Windows password and PIN, or set one up prior to using fingerprint to sign in. This is required by Microsoft.
- Ensure that the PC is connected to the internet.
- Ensure that there is no other fingerprint recognition software running (such as those preinstalled on some laptops).
Connecting the USB reader
- Insert the SideSwipe into any available USB 2.0 or 3.0 port. The Windows Plug-and-Play New Hardware Wizard should appear and present you with the option to allow Windows to search for drivers.
- Windows will download the drivers from Windows Update and install them automatically
- If Windows Update is unable to locate the appropriate drivers, please review this section to ensure that Windows Update is enabled.
Download the SideSwipe driver for Windows 10 directly from BIO-key
How do I?
- How do I ensure Windows Updates are enabled on my PC?
- How do I manually download drivers from Windows Update?
- How do I verify the device was installed properly?
- How do I enroll my fingerprints in Windows Hello?
- How do I sign-in to Windows Hello using my fingerprint?
Windows Updates
- Windows Updates should be enabled to allow for the reader driver to be automatically downloaded and installed once the reader is connected.
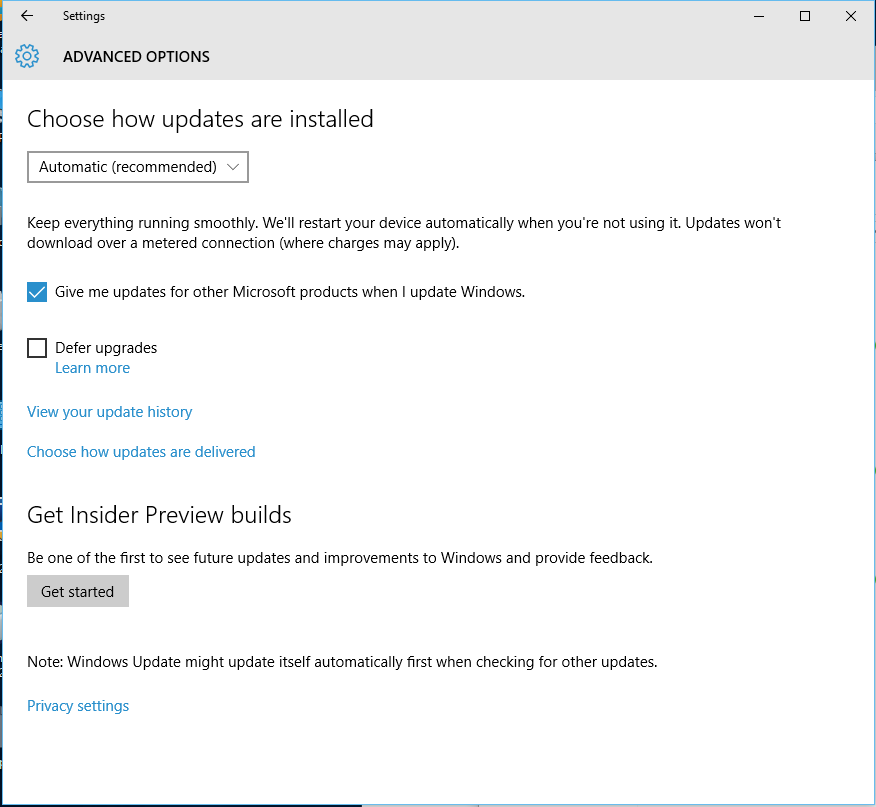
- You can verify your settings via: Start > Settings > Update and Security > Windows Update > Advanced Options
- In the dropdown box for “Choose how updates are installed”, select “Automatic (recommended)
- Install updates automatically (recommended)
- Manual installation or download and installation options will also work
- Select the checkbox for “Allow all users to install updates on this computer”
- If your PC is a member of a domain, and Windows Updates are not enabled, please contact your IT Administrator.
Manually Download Drivers
If Windows Updates cannot be enabled, please follow the instructions to manually download the drivers from the Microsoft Updates website.
- Open the Microsoft Update Catalog page: https://catalog.update.microsoft.com/v7/site/Install.aspx
- Use the search field on the web page to locate the manufacturer’s driver for your reader by searching the keywords:
- Type: “VFS300”
- Select: “Validity Sensors, Inc…” for Windows 10
- Once the driver has downloaded, you must extract the files to a folder on your local hard drive using Microsoft Explorer, WinZip, 7zip, or other applications.
- * If you download and extract the driver manually, be sure to remember the location of the drivers .inf file, as this will be required to successfully install.

- In Device Manager, select the Validity Sensors VFS300 device and tab to the Drivers Update, and point to the folder where you extracted the driver package.
To verify the device is properly installed
- Open the Windows Device Manager by: Start > Control Panel > All Control Panel Items > Device Manager
- Ensure that “Validity Sensors (WBF) VFS300” is listed under “Biometric devices”
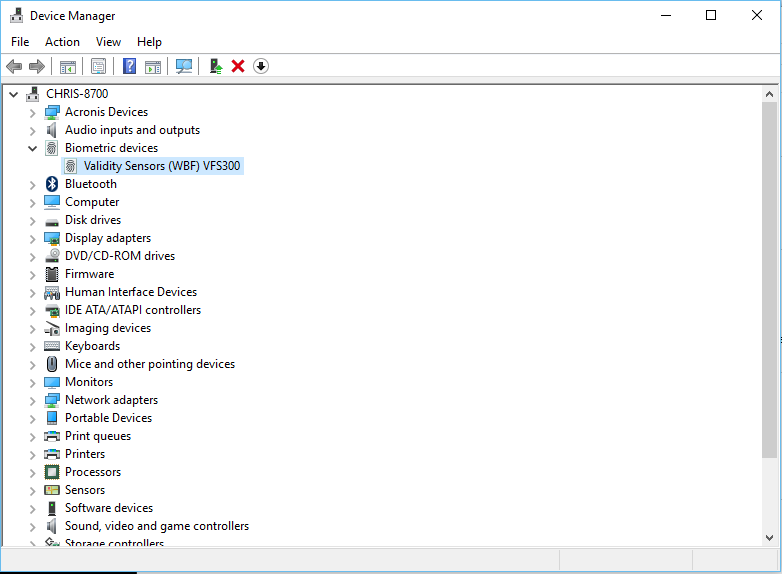
- If it is listed under USB Devices and has a warning label, it needs its drivers updated/installed.
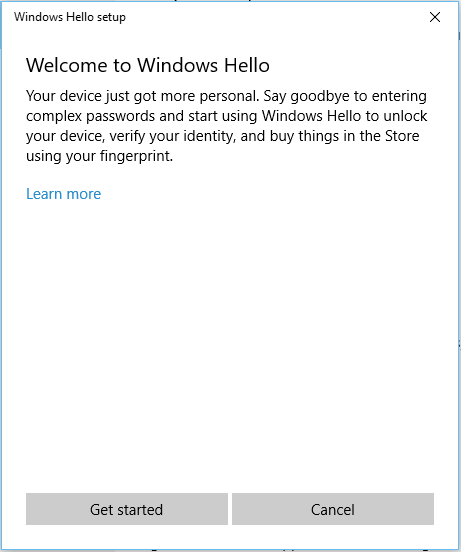
How do I enroll my fingerprints for Windows Hello?
- Click on Start > PC Settings > Accounts > Sign-in options
- Click Add button under the Fingerprint section.
- You will be prompted to create a PIN if you do not have a PIN registered.
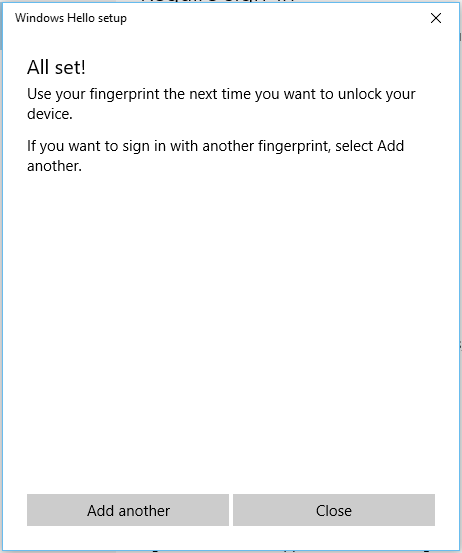
- To add another fingerprint, Click the “add another” button.
- On the Welcome Screen, click the “Get Started” button.

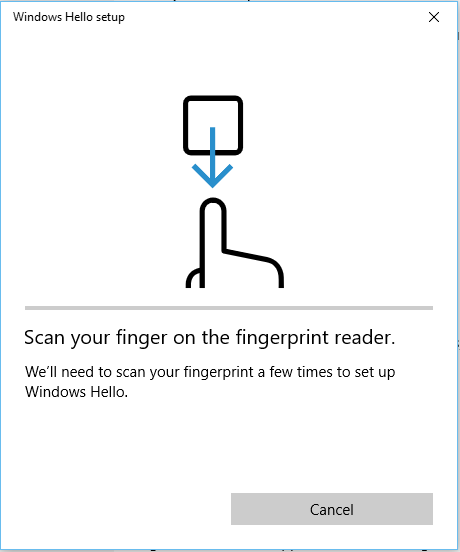
- Enter your PIN (this may have just been created)


- Swipe your finger across the reader. The progress bar will move as you enroll.

- Click Close to exit this wizard, or click “Add another” to enroll another finger.

How do I sign-in to Windows 10 using my fingerprints?
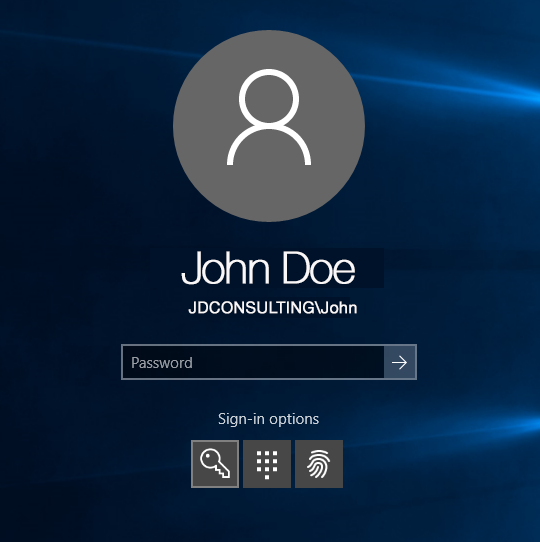
- If required, press CTRL-ALT-DEL or click/touch to view the sign-in screen.
- If not visible, click “Sign-in options” and select the fingerprint icon.

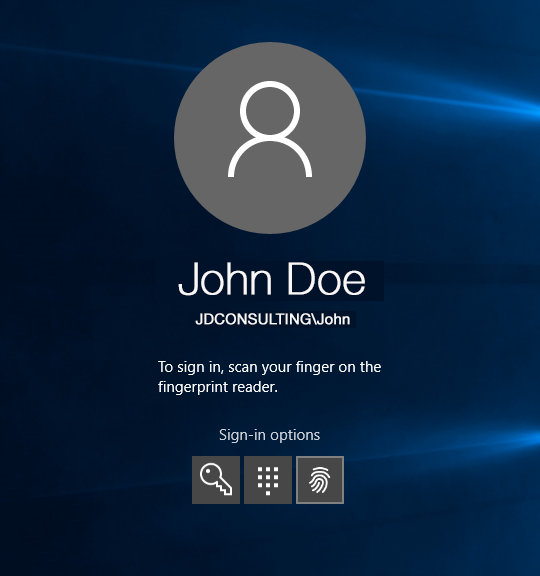
- Swipe your finger to sign-in to Windows.

Manual Driver Download for Windows
SideSwipe Driver Download for Windows
Manually Download Drivers
If Windows Updates cannot be enabled, please follow the instructions to manually download the drivers from the Microsoft Updates website.
- Open a browser and go to https://www.catalog.update.microsoft.com/Search.aspx?q=validity%20vfs300
- Select the driver for your operating system (Windows 10) which is version 4.5.235.0.
- Be sure to remember the location of the driver’s files you download, as this will be required to successfully install.
- To Manually install the driver:
- Extract the files from the previously downloaded “.cab” file (can use 7zip or similar)
- You can install with either of 2 methods:
- Go to device manager->Biometric Devices->Validity->Driver tab and select “Update Driver,” Browse my computer for driver software and provide the path of the folder where you downloaded driver, or
- Run Command Prompt as administrator and change to folder you unzipped the cab file and run the following command: pnputil -i -a WBF_VFS300_wu.inf
If after confirming all these steps and actions, and assure you are not blocked due to domain policies, please advise of your exact issues and error messages to support@bio-key.com.